Master Amazon PPC! Navigate fierce competition & rising ad costs with proven Amazon advertising strategies. Create high-performing campaigns for better sales.
Complete Amazon Advertising Guide [2024 Tips, Tactics, Examples]
Amazon advertising can help you reach shoppers who are actively searching for your products, but competition is fierce, and ad costs are soaring.
Thankfully, this Amazon PPC guide will get you ahead of many sellers by showing you proven Amazon advertising strategies that will help you create high-performing campaigns.
Amazon PPC Explained
Pay-per-click (PPC) advertising involves positioning your product or brand in front of shoppers and paying a fee whenever your ad is clicked.
It’s an auction-style advertising model offered by Amazon, Google, Microsoft, and other big platforms.
With Amazon PPC, you choose which search terms or products you want your ads to appear for and decide how much you want to spend each time someone clicks on your ad.
Amazon considers your bid and listing’s relevance to a shopper’s search query and decides whether your ad gets shown or not.
This means a higher bid doesn’t guarantee the top spot, but it can increase your chances.
Additionally, the type of ad you choose determines where your listing appears.
Let’s look at the three main types of Amazon ads and how best to use them.
- Sponsored Products:
This is the most common type of Amazon PPC ad.
SP ads look like organic listings and appear in search results and product listing pages.
Sponsored products promote a single ASIN and take shoppers to the product’s detail page when clicked on.
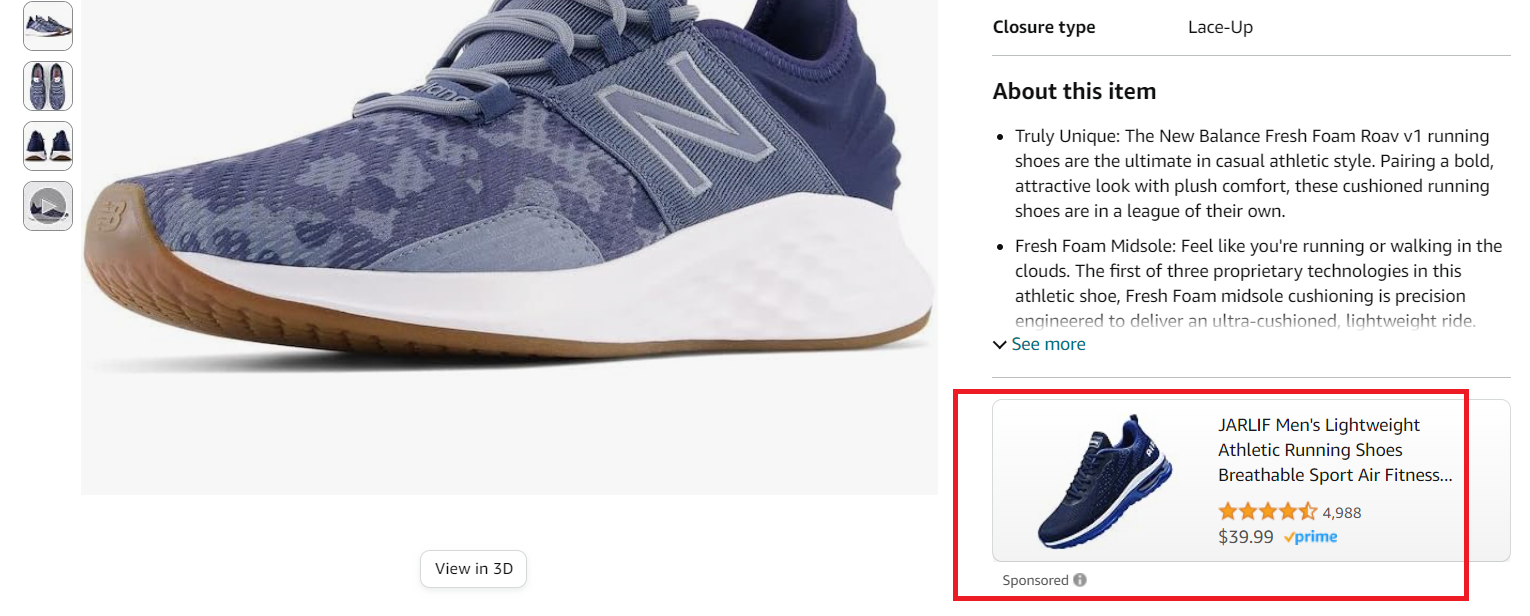
Like the example above, you can bid on a keyword e.g “running shoes for men” to have your product displayed when shoppers search for it.
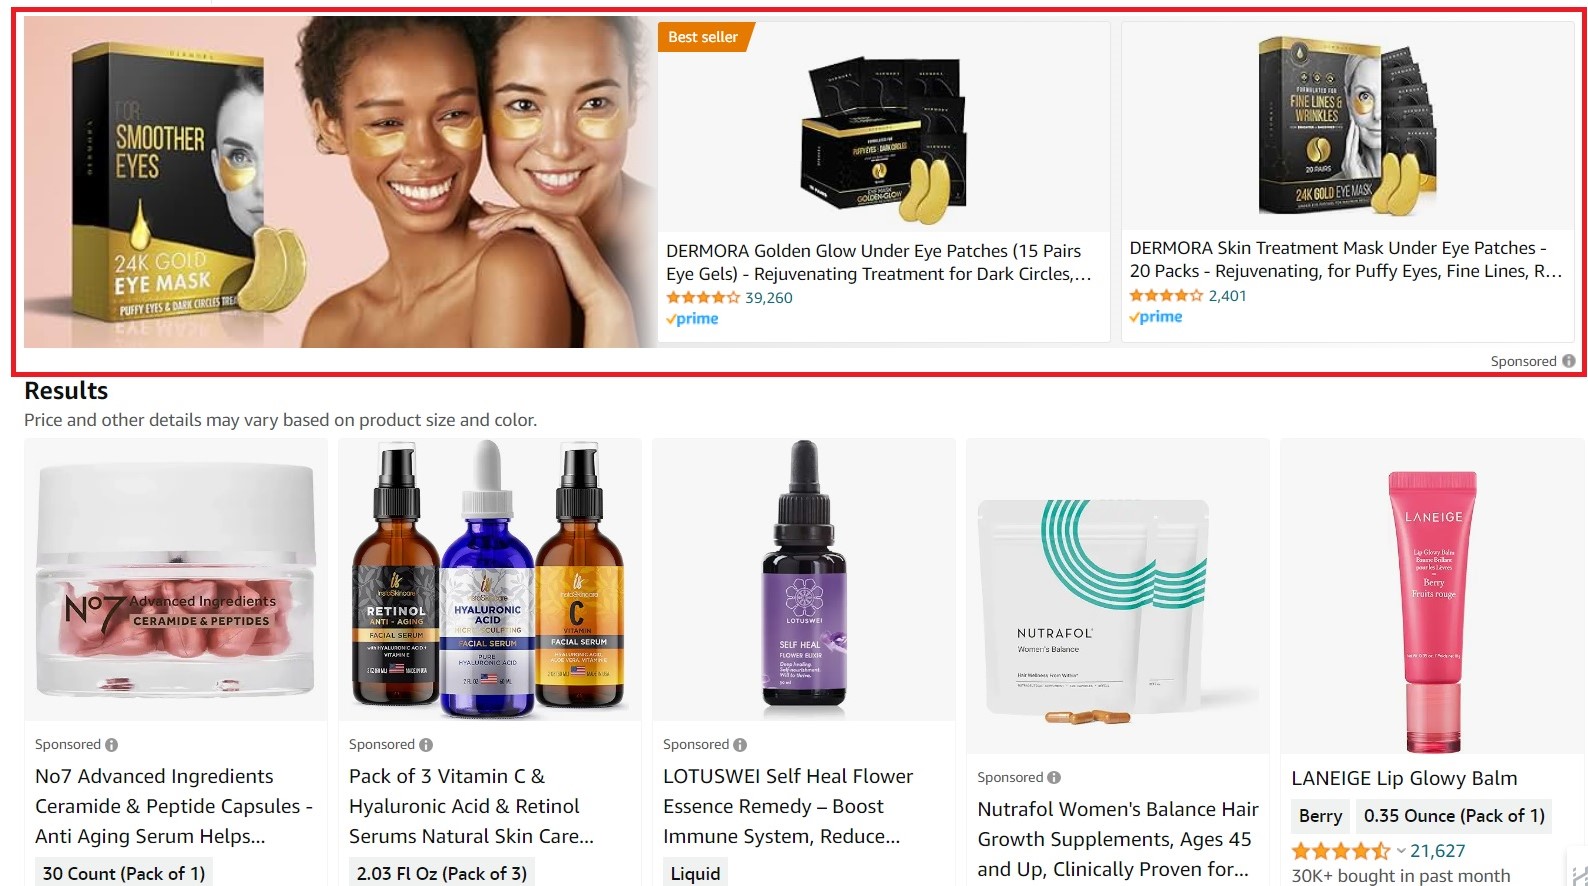
Your Amazon product listing can also be displayed as an alternative to your competitor’s products if you target them. This is a good way to reach shoppers on listings that sell similar products but have lower ratings and higher prices.
As a general rule, invest around 80% of your ad budget in SP because it has the highest ROI and is more scalable compared to other ad types.
It also provides new sellers the lowest barrier to entry because you don’t need Amazon’s Brand Registry to use it. - Sponsored Brands:
These were formerly known as headline search ads. They advertise your brand by showcasing your logo, a custom headline, and multiple products.
SB ads can also be in video format. This is usually a 15-30-second-long video you can use to showcase your product’s benefits.
You need to enroll in the Amazon brand registry and have a minimum budget of $1 daily to run SB ads. And like SP ads, you target keywords and ASINs and only pay for clicks.
SB is best for sellers who have a reasonable ROI on SP and are looking to build authority in their niche by increasing brand awareness.
For example, a beauty products seller can use SB ads to drive traffic to their entire storefront and incorporate compelling text and images instead of advertising only their lipstick.
While SP ads have a better ROI than SB, a customer who clicks on SB ads will likely buy more products, increasing your AOV and brand loyalty. - Sponsored Display:
Sponsored Display features single product images and can be used to reach customers on and off Amazon.
Similar to SB, you need to enroll in the Amazon brand registry to run SD ads. You are either charged on a pay-per-click basis or CPM (you pay for every 1000 impressions your ad gets).
With SD ads, you can target ASINs or audiences based on shoppers’ behavior, making them perfect for reaching customers who viewed your products without buying and those already browsing competitor listings.
For example, a seller of hiking gear can target shoppers who have viewed their hiking boots listing without buying.
These shoppers will see display ads of the seller’s boots on Amazon and Amazon partner websites.
This increases the chances of them returning to the seller’s store when they are ready to buy.


| Ad Type | ROAS | Average Spend |
| Sponsored Products | High | 85% of total budget |
| Sponsored Brands | Medium | 13% of total budget |
| Sponsored Display | Low | 2% of total budget |
Once you’ve decided on the type of ad to run, you need to know how to set efficient bids.
Amazon Bidding
A bid is the price you’re willing to pay Amazon per click. You can determine this manually or automatically. Here’s how:
Manual Bidding
With this method, you are responsible for deciding how much to bid for each keyword in order to hit a certain ACoS target.
There are two common ways to do this:
- Revenue-Per-Click (RPC) Bidding: Multiply your ACoS target by your EPC (earnings per click) to determine your ideal CPC.
For instance, if your target ACoS is 35% and you earn $6 per click on a keyword, your ideal CPC will be $2.10 (0.35 * $6.00).
RPC bidding gives you a predefined way of changing bids, which makes it easier to use.
However, it is not as flexible as rule-based bidding. - Rule-Based Bidding: This requires setting rules that guide how much to bid.
An example of rule-based bidding is “if ACoS exceeds X amount, decrease bids by Y amount.”
This is more difficult to master, especially for beginners, but it can be worth the effort if RPC bidding doesn’t work for you.
Automatic Bidding
Just like its manual counterpart, automatic bidding involves changing bids to hit an ACoS target.
The major difference is that rather than making changes or coming up with bidding rules yourself, you simply input your target ACoS and the algorithm does all the hard work for you.

Automatic bidding is more accurate than RPC bidding and simpler than rule-based bidding.
It is perfect for new and established sellers because it requires little supervision and ensures that your ads appear for the right keywords.
Plus, it tailors bidding strategies to each account based on historical data.

The bid changes above were made for a poor-performing keyword by our AI software.
We have been training our AI for years, so it makes accurate bid changes. Plus, it tells you exactly what was done and why, so you’re still in control without having to make the changes yourself.
Now that you know how to set bids, let’s familiarize you with the Amazon ecosystem before showing you how to set up ads.
Key Amazon Metrics
In addition to understanding bidding and ad types, you need to know these seven metrics to manage your Amazon ads effectively.
- Impressions: The number of times shoppers saw your ad.
- Clicks: The number of times shoppers clicked on your ad.
- CPC (Cost Per Click): The amount paid to Amazon per click. It varies based on competition and marketplace, usually $0.5 to $3.
- CTR (Click-Through Rate): The percentage of shoppers who clicked on your ad when they saw it. CTR = (clicks/impressions) x 100
You should aim for 0.5% to 1.5% for sponsored products. - CVR (Conversion Rate): The percentage of shoppers who purchased after clicking on your ad. CVR = (orders/clicks) x 100
You should aim for 10% or higher. - Search Terms: These are the words or phrases your ads showed up for.
- ACoS (Advertising Cost of Sales): The ratio of ad spend to sales. ACoS = (ad spend/ad sales) x 100.
While 40% is a good starting point for most sellers, you should set your ACoS target based on your goal and category average. - ROAS (Return on Ad Spend): This tells you how much revenue you earn for every dollar spent on advertising.
ROAS = (Revenue from ads) / (Cost of ads) - Keywords: Words or phrases you bid on so that your listing is shown to shoppers.
For example, if you’re selling an iPhone case, you might use keywords like “protective iphone case” or “iphone cover.”
You should start with relevant keywords with high CVR, high search volume (500+), and low competition.
How to Setup Amazon PPC Campaigns
After deciding which product you want to advertise, how much you want to invest in ads, and which ad type to use, the next step is to setup your campaign.
Since Sponsored Products are the easiest and most profitable ad type, we’ll focus on how to create SP campaigns through Amazon and automated tools.
Setting Up Campaigns on Amazon
Step 1: Log in to your Seller Central account and click on “Campaign Manager” under the advertising tab

Step 2: Inside the campaign manager, select “Create campaign”

Step 3: Choose your campaign type

Step 4: Insert ad group name

We recommend using an ad group name that makes it easy to tell each ad group apart and filter them.
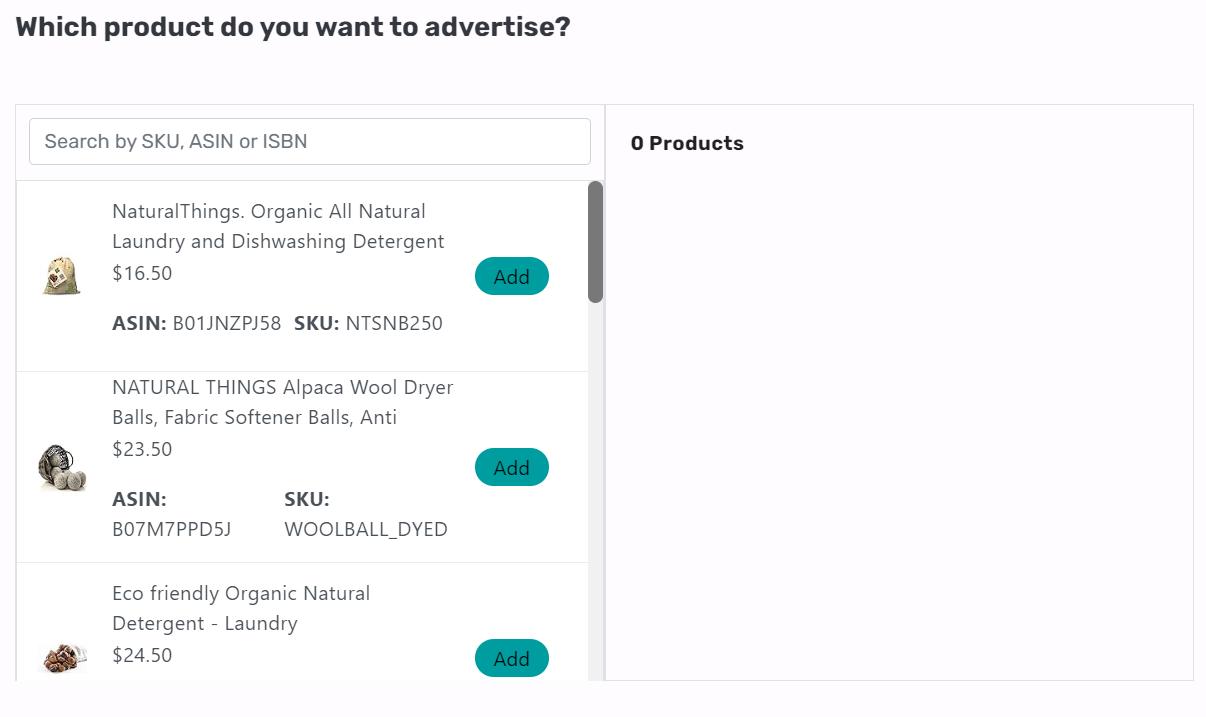
Step 5: Select the product you want to advertise
Step 6: Choose a targeting strategy

Automatic targeting gives Amazon total control over which keywords or products your budget is spent on.
While manual targeting allows you to choose the keywords and ASINs you’d like to target, and how much to bid on each.

When targeting keywords, you have three options: broad, phrase, and exact match.
- Broad Match: Your ad shows up when someone searches for your keyword in any order.
For example, if your keyword is “pink shoes,” your ad might show up for searches like “pink running shoes” or “pink sneakers”.
- Phrase Match: Your ad shows up when someone searches for your exact keyword phrase, but it can include words before or after it.
For example, if your keyword is “pink shoes,” your ad might show up for searches like “cheap pink shoes” or “pink shoes for kids”.
- Exact Match: Your ad appears only when someone searches for your exact keyword phrase without extra words.
For example, If your keyword is “pink shoes,” your ad will only show up for searches like “pink shoes” and not for “buy pink shoes” or “shoes pink.”
We recommend using one keyword match type per campaign for easy Amazon PPC optimization.
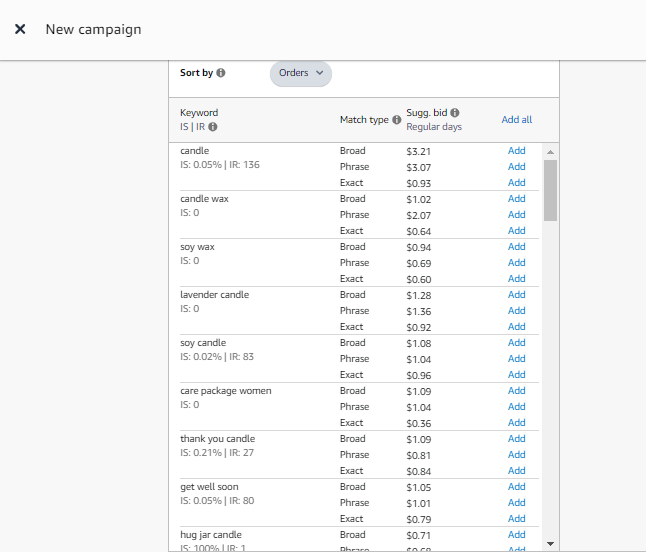
Now that you know what each keyword match type means, here are three ways to find the right keywords to target in your PPC campaign:
- Think like a shopper: Imagine you’re looking for a product like yours. What words or phrases would you use to search for it? Make a list of these words.
You can also add the words that Amazon suggests as you start typing in the search bar to the list. - Use Amazon’s Suggestions: When creating your ad campaign, Amazon suggests keywords that you can bid on.
However, just like using the search bar, not all the suggested keywords will be relevant to the product you are advertising, so you should review the suggestions.
For example, if you are creating a PPC campaign for a sports water bottle, you might see the suggested keyword “glass bottle.” This wouldn’t be a good fit for your product, so you wouldn’t want to bid on it. - Keyword Harvesting: This involves collecting profitable search terms from campaigns.
Of all the three methods, it is the most recommended because the keywords here have worked in other campaigns.
Here’s how to harvest keywords:
After your campaigns have run for a while, download your search term report.
Then, pick out all the terms that have led to at least one sale and add them as keywords to the campaigns advertising the same ASIN.
The keywords found with this method will be better quality than the ones obtained with the other two, but harvesting keywords takes time, especially when you’re running PPC campaigns for many ASINs.
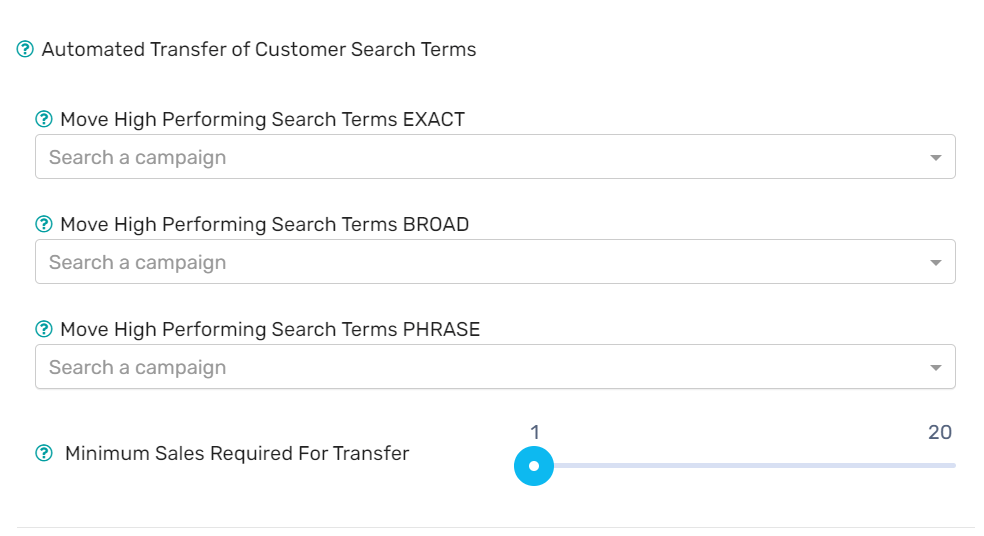
Thankfully, AI automation tools like AiHello can do it for you.
Simply go to the autopilot settings of the campaign you wish to harvest from and connect it to the manual campaign where you want the keywords added.


Step 7: Negate keywords
Negating a keyword prevents yor ads from showing up for it.
If you’re a new seller, you should skip keyword negation until your first campaign has been launched.
But if you have campaigns running already, download your search term report for the past 30 days and add it to a Google Sheet.
Next, identify search terms that have spent the product’s average order value (the average amount a customer spends per order) without generating sales.
Then, add them to the negative keyword list in your campaign.
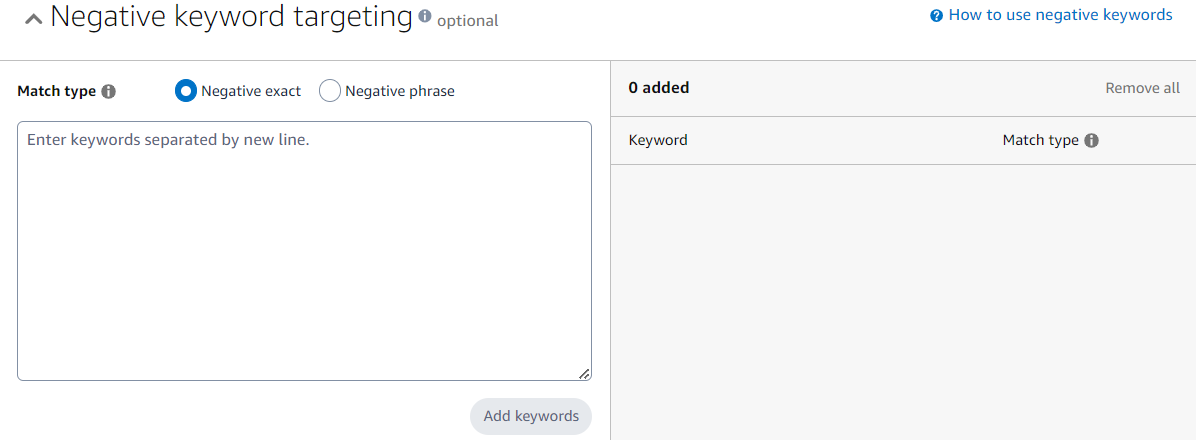
While keyword negation keeps you from wasting your ad spend, it can be very time-consuming to go through hundreds or thousands of cells on a spreadsheet to find potential negative keywords.
That’s why we added a keyword negation feature to our software.
You can use it to automatically prevent your ads from appearing for wasteful search terms.

Step 8: Choose a bidding strategy
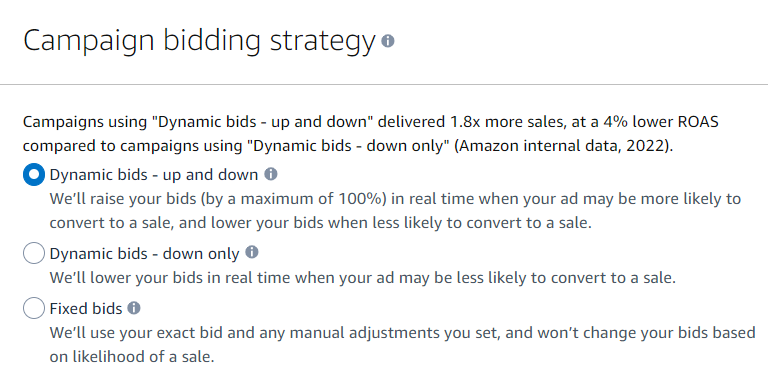
When starting out, you shouldn’t bother much about cutting down on costs because you need the initial traction.
We recommend using “Dynamic bids – up and down” with your category’s average CPC as the initial bid if you are just starting out.
Then, you can gradually adjust your bids based on keyword performance.
If you’re an established seller looking to reduce costs, “down only” is better. It’ll help you conserve your budget and get more results with less spend.
It’ll also prevent your ad from showing up for irrelevant product searches.
Step 9: Choose your campaign name

You want to maintain a consistent naming convention across all your campaigns for better organization.
Here’s the format our specialists use at AiHello:
Product identifier/Name_ASIN_(Ad Type) (Targeting type) (Match Type)(Set no.)_AiHello
Example: Drinkware_B0CFZTIO9H_SP_KW_Ph1_AiHello
The above campaign name is for a Sponsored Products campaign targeting keywords with phrase match.
If there are more keywords, we’ll create another set and name it Drinkware_B0CFZTCC9H_SP_KW_Ph2_AiHello
Step 10: Launch your campaign
Once you’ve added all the necessary details, click the “launch campaign” button at the bottom right corner.
Setting Up SP Campaigns Through Automated Tools
With regular PPC campaign creation, you have complete responsibility from ad setup to management.
However, automated tools can streamline the process, saving you time and potentially improving campaign performance.
Let’s explore how to build PPC campaigns with automated tools like AiHello.
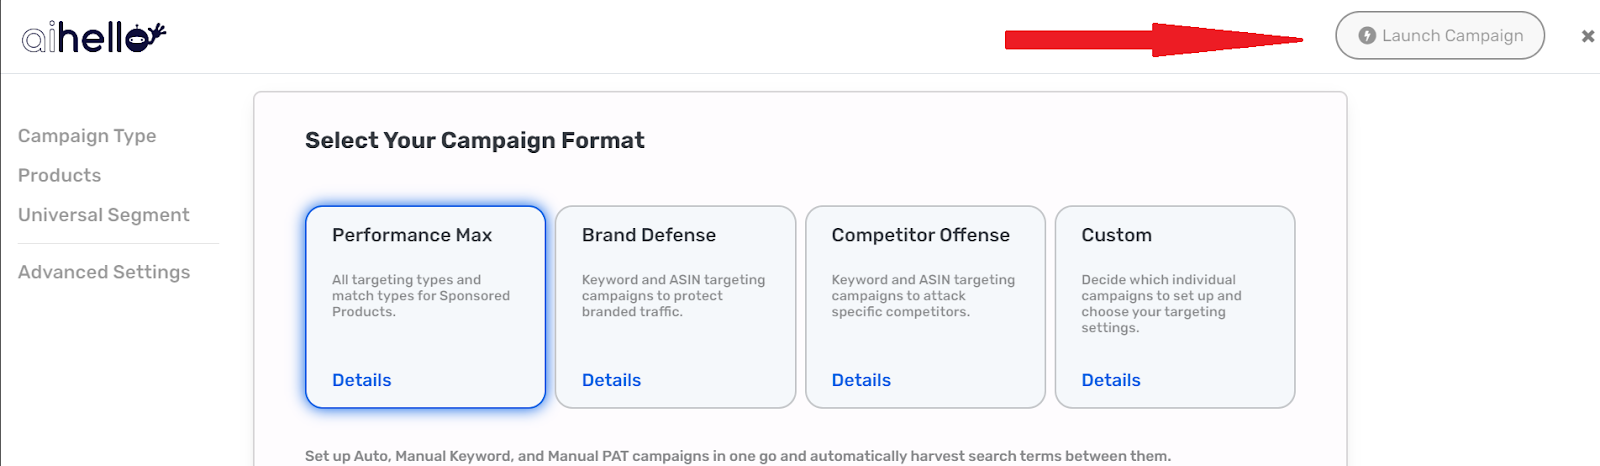
Step 1: Click “create campaign” under the campaign tab

Step 2: Select your campaign format

Performance Max includes all the match types and targeting types for SP. This should be the base setup for any product.
Brand Defense allows you to target your own brand keywords and ASINs to prevent your competitors from advertising on them.
Competitor offense allows you to target your competitors’ brand keywords and ASINs to steal their customers.
Custom lets you choose the specific campaigns you want.
Step 3: Select your ASIN
Step 4: Other campaign settings
The AI will automatically suggest a target ACoS and budget based on your current data, but you can adjust them to put your own figures.

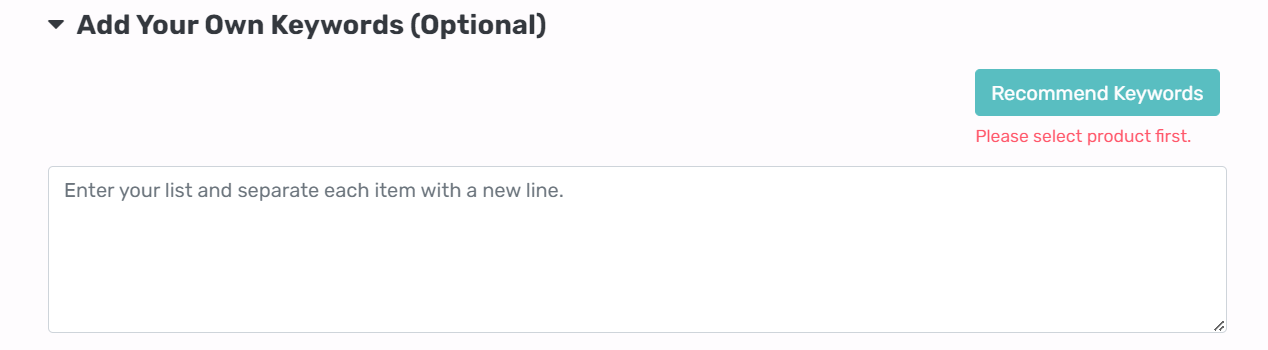
Additionally, AiHello sources hundreds of relevant keywords and ASINs for your campaigns without you having to lift a finger.
You can also add your own keywords and ASIN targets.
Step 5: Launch campaign
When you’re done, click the launch campaign button, and your ad will be live in minutes.
In summary, setting up PPC campaigns automatically gives you as much customizability as a manual setup.
You get to negate keywords, add placement boosts, and use all of the bidding strategies. The only thing you don’t get is the stress of having to figure out everything yourself.
Plus with the AiHello software, you remain in control. You get timely reports on what the AI is doing and why, and you can make instant changes.
Amazon PPC Management
Optimizing Amazon PPC ads requires time and expertise. If your budget allows it and you lack the internal resources, an Amazon agency can be a great option.
An Amazon advertising agency’s experience is even more important if you’re in a competitive market. They can save you hundreds or thousands of dollars on inefficient ad spend.
Here’s some good advice to consider when hiring one:
- Look for experience: Ask about their experience in your industry and with similar products. Ask for examples of successful clients too.
- Transparency and communication: Ensure they provide clear communication on their strategies, fees, and reporting structure.
- Data-driven approach: The agency should emphasize data analysis and use it to optimize campaigns.
- Clear goals and KPIs: Set defined goals like increased sales or lower ACoS to track progress.
Real-life Amazon Advertising Examples
1. This Client Quadrupled Their Sales at a 20% ACoS
When we met, one of our clients was doing $60k/mo at a 45% ACoS.
Last year, they hit $250k/mo at a 20% ACoS. Here’s how:


Before AiHello, the brand was spending $25k per month on ads for various products. Some did well, others didn’t.
After AiHello, they increased their spending to almost $50k a month but $46k of that went to a single ASIN.
This was because the product had the best reviews, the highest CVR, and a much higher search volume than many other ASINs combined.
It also spent 20% to 30% of the budget and generated 80% of total sales, which proved it was very efficient.
After our adjustments, the ASIN now does multiple 7 figures in ad sales and organic sales. That’s a lot more than what the total account used to do.
To use this strategy, start by sorting your ASINs in business reports based on sales volume and identifying the top products that collectively generate 80% of your revenue.
Next, go to “products” in your campaign manager to identify ASINs where total sales contribution is higher than spend contribution.

Then use Helium10 to get a rough estimate of how much the top 5 competitors for those products sell. This will show you whether or not these ASINs have the potential to grow.
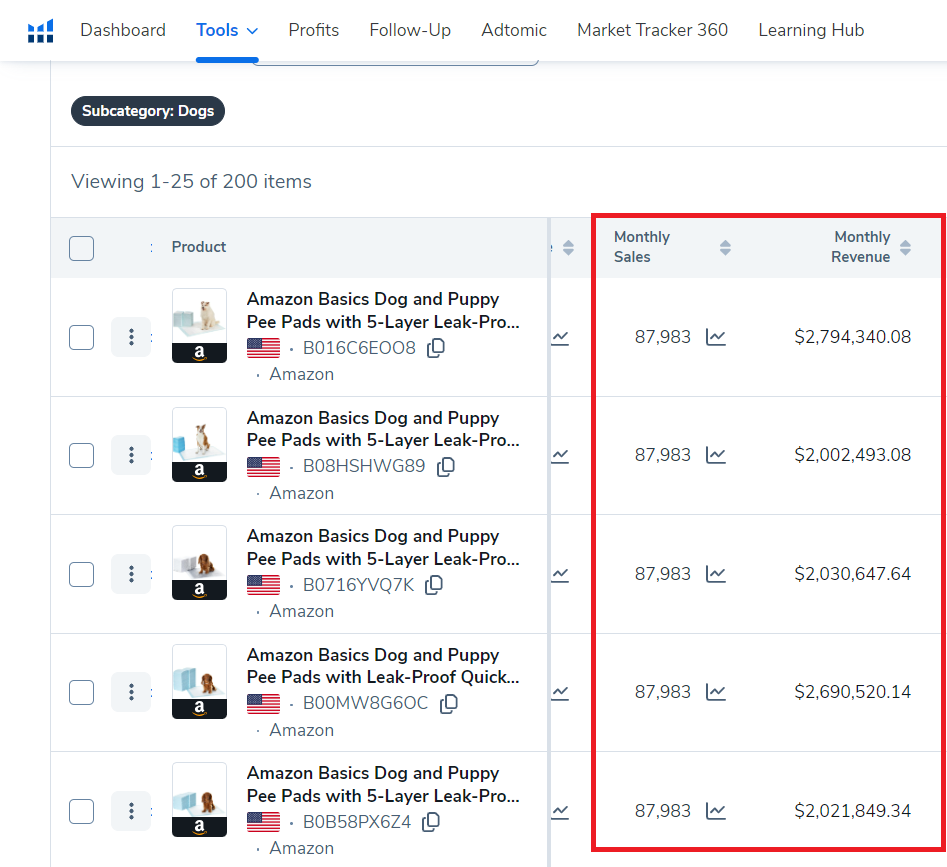
When you find a high-performance ASIN, where competitors are selling 2-5 times more than you are, invest more in that product.
2. Extra $247k at a 13% ACoS
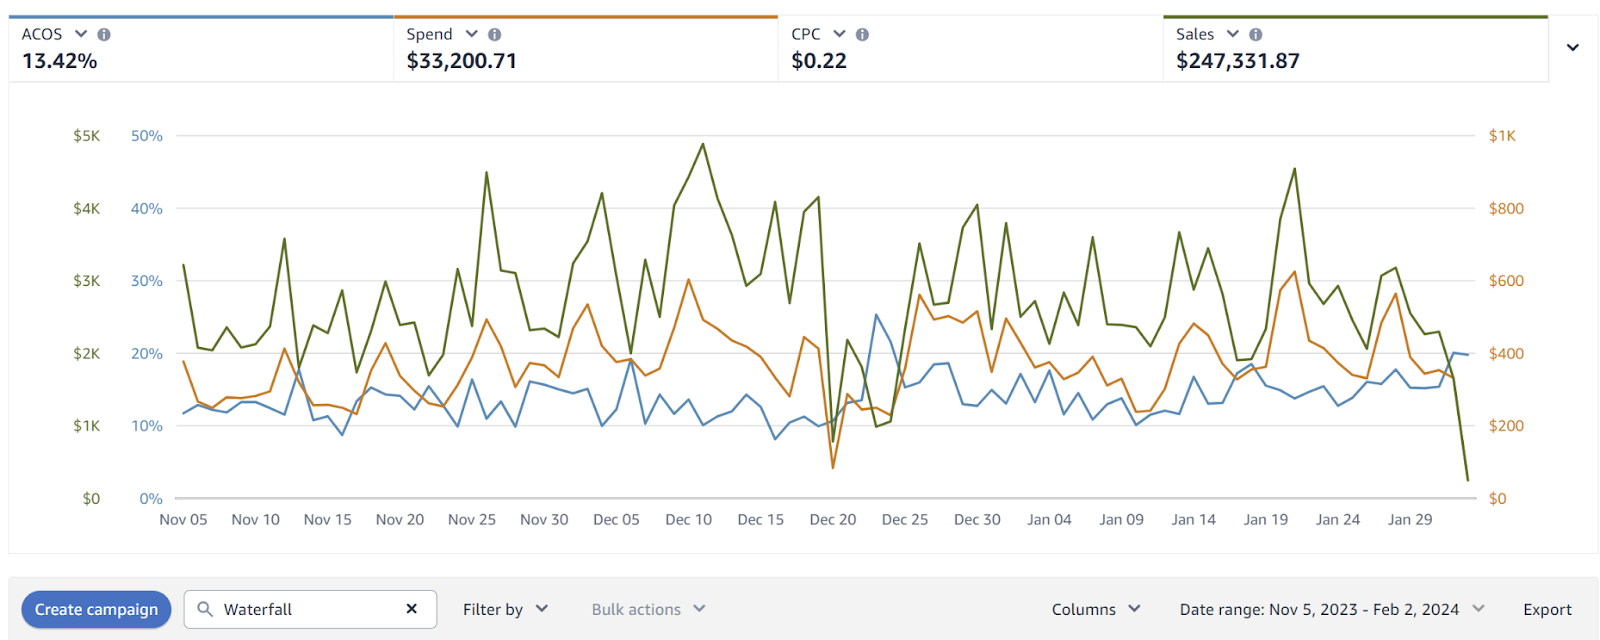
For this client, we implemented the “waterfall strategy”.
This means we set up an auto campaign with one ad group for each SKU.
Then, we assigned 10-25 cent bids to each target while using down-only bidding with minimal or zero placement boost.
Once we set this up, each ad group started getting a small number of clicks.
And when you multiply those clicks across the number of ad groups we had, you’ll realize that we were generating a lot of traffic.
The best part is that even though we made our client an extra six figures, it was on auto-pilot.
We made little to no adjustments after set-up.
If you have a large catalog, you may want to try out this strategy.
3. 27% Sales Increase in 12 Days
By fixing a client’s campaign structure, we boosted their sales by 27% in 12 days while keeping ACoS at 22%.
Before: 12th January – 23rd January

After: 24th January – 4th February

When we started working with this account, only 3 campaigns were active, and each one contained over 30 keywords.
This means each campaign’s ad budget was randomly allocated to the keywords.
As a result, they underspent on keywords that drove the most sales and spent a lot on poor-performing ASINs and broad keywords.
So, we cut back on spend for the poor-performing keywords and ASINs, put the broad keywords in an ad group with a fixed budget, and negated search terms that have spent the product’s AOV without a conversion.
Then, we assigned each campaign 1 ASIN, 1 ad group, 1 match type, and 5-10 keywords. This allowed us to control the distribution of ad spend better.
The top-performing search terms were also put in single-keyword campaigns to get the most out of them.
Wrapping Up
Your Amazon PPC advertising campaigns do not have to be a guessing game.
Following the steps outlined in this article can help you attract more customers, increase your conversion rate, and make your profits soar.