Introduction
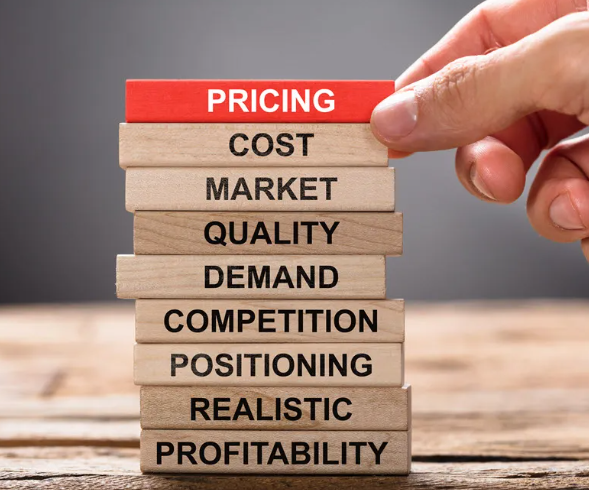
Pricing isn’t just a number—it’s the difference between making a sale and losing one.
Price too high? Customers click away. Price too low? You risk hurting your profit margins.
Whether you’re a private-label seller building a brand or a wholesale seller competing for the Buy Box, mastering pricing is essential for long-term success.
The key to an effective pricing strategy is that it evolves through multiple phases, from launch to maturity, balancing profitability and competitiveness at every stage.
In this guide, we’ll break down the essentials of pricing, whether you’re a private label or wholesale seller. Let’s get started!
Private-Label Pricing – From Launch to Maturity
Step 1: Calculating the Ideal Price Based on Costs
A profitable pricing strategy begins with a clear understanding of the costs associated with launching a private-label product. So, you need to account for the following:
- Landed Costs: These are all the expenses that your product incurs as it makes its journey from the supplier to your warehouse. They include the product’s manufacturing costs, shipping fees, customs duties, taxes,..etc).
- Referral Fees: This is the commission Amazon takes. The fee is usually 15% with a $0.30 minimum per item.
- Fulfillment Fees: In exchange for letting Amazon handle the picking, packing, and shipping of your products to customers, you’ll pay a fulfillment fee.
- Ad Costs: All sellers know they have to advertise to sell their products on Amazon, so this usually costs about 10-30% of their revenue.
Roughly speaking, all of these costs combined should represent 70% of your product’s price, as you want to maintain a 30% profit margin. So, you take all of these costs and divide them by 0.7 which will give you the product’s ideal price, margins-wise.
Once a profitable price is set, the next step is validating it against the market using the Helium 10 Chrome Extension, which we’ll cover at length next!
Step 2: Researching the Market to Compare Prices
Using the Helium 10 Chrome Extension to research competitor prices gives you instant market insights, helping you determine if the price you calculated in the previous step is competitive. Here’s how it works:
Step 1: Identify Relevant Competitors
Not every seller in your category is a direct competitor. The key is to compare yourself to those who offer similar products in terms of:
- Quantity (e.g., if you sell a 2-pack, compare it to other 2-packs, not single items)
- Quality (materials, branding, reviews, and product positioning)
- Seller Type (are they a private-label brand, a reseller, or a big-name brand)
Targeting the right competitors gives you accurate pricing benchmarks, so identify five direct, strong competitors for a meaningful comparison.
Step 2: Analyze Competitor Pricing
Once you’ve identified your competitors, visit a competitor’s listing and check out the current prices they are selling at to see if your target price is above or below it.
You can set your product at a higher price if your brand is well-known, has plenty of good reviews and a compelling listing.
If you’re launching a new brand, however, start at or slightly below market price and use coupons or discounts to attract customers.
Using Coupons & Discounts to Drive Early Sales During Launch
Offering coupons and discounts is an effective strategy for new private-label sellers to increase conversions and generate reviews. Early sales signal to Amazon’s algorithm that your product is relevant, helping you rank higher in search results.
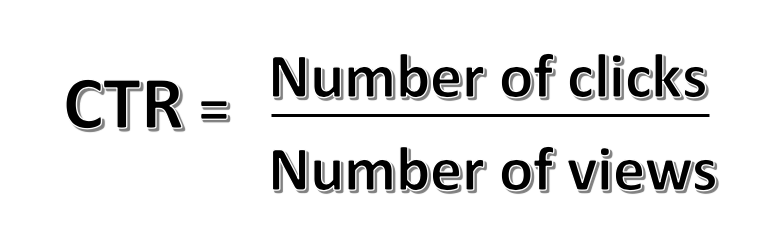
Coupons also boost Click-Through Rate (CTR) because they create urgency and make your listing more attractive. More conversions improve your organic ranking, resulting in more visibility and sales.
Wholesale Pricing – Optimizing for the Buy Box
Unlike private-label sellers, wholesale sellers compete directly for the Amazon Buy Box. This means pricing is not about brand positioning but rather being the best offer while maintaining profit.
Step 1: Calculate Your Minimum Price
Before listing a wholesale product, determine the lowest price you can sell at without losing money. You can do this by:
- Starting with your wholesale cost per unit. This is the price you pay the supplier for each unit.
- Adding Amazon’s referral and fulfillment fees.
- Factoring in shipping costs to Amazon warehouses.
- Set a target profit margin. After covering all costs, ensure your price leaves room for your target profit margin.
Now you can calculate your minimum price = (wholesale cost + Amazon fees + shipping) ÷ (1 – target profit margin).
Step 2: Research the Market & Competitor Pricing
First of all, you need to analyze the sellers selling the same product on your listing.
Then, compare the price of the Buy Box winner to the other prices so you can see whether or not the minimum price calculated in the previous step is competitive.

Competitors’ prices are available under the “Other Sellers on Amazon” option below the “Add to Cart” button.
While reviewing listings, assess your competition—do they have many reviews with low prices, fewer ratings than you, or sell at significantly higher prices?
This will help you determine whether you need to adjust your pricing strategy, either by competing more aggressively, leveraging your seller ratings, or positioning your product as a premium option.
Now that we’ve covered the fundamentals of pricing across different business models, let’s dive into active repricing.
Repricing
Whether you’re a private-label seller or a wholesale seller, pricing isn’t a one-and-done job.
Repricing is the ongoing process of adjusting your prices to stay competitive, drive sales, and protect your margins.
Repricing is essential for both private-label and wholesale sellers. For private-label sellers, it directly impacts sales and profit margins, while for wholesale sellers, it’s vital to maintaining high Buy Box levels.
For repricing, sellers have two options: they can use manual repricing through Amazon’s Seller Central or use a third-party tool to automatically reprice their products.
While manual repricing is suitable for sellers with a small catalogue or products with low sales volume and limited data, automatic repricing is crucial once you’re running a larger catalogue and need data-driven decisions to be made.
However, not all automation is built the same; in fact, automatic repricing can be split into three approaches: rule-based, algorithmic, and conditional.
Rule-based repricing allows sellers to set fixed pricing rules. For example, sellers may choose to set rules for prices to go down if their daily sales drop below X units, or when competitor X raises their price, the seller follows suit to protect margins.
Other rules can be set for winning the Buy Box, so once a seller secures the Buy Box, they set a rule for the price to increase incrementally to boost profits without losing the position.
✅ Pros:
- Full control over pricing decisions
- Predictable and easy to set up
- Ensures consistency with a seller’s pricing strategy
❌ Cons:
- Requires constant monitoring
- Cannot adapt to unexpected market changes
- May lead to price wars if rules aggressively undercut competitors
Algorithmic repricing uses AI-driven algorithms to analyze sales trends, competitor behavior, and demand shifts to ensure pricing remains competitive and profitable without manual intervention.
Sellers can use algorithmic repricing to adjust prices based on market conditions. Instead of following fixed rules, the algorithm analyzes real-time data and optimizes pricing decisions automatically.
For example, if the seller is competing for the Buy Box, the algorithm identifies the optimal price point by considering competitor prices, fulfillment method, and seller rating. It may adjust the price in small increments rather than aggressively undercutting to increase Buy Box win rates without unnecessary profit loss.
Another scenario is when competitors stock out; the algorithm can detect this shift and raise the price to capitalize on reduced competition and increase profits.
Also, if demand spikes (e.g., during seasonal trends or after a positive product review), the repricer increases the price accordingly to take advantage of shoppers’ higher willingness to pay, or if sales slow down, the algorithm gradually lowers the price within the seller’s set limits.
✅ Pros:
- Uses AI to optimize prices dynamically
- Considers multiple factors (competition, demand, Buy Box likelihood)
❌ Cons:
- Higher cost compared to rule-based repricing tools
- Less transparency in how pricing decisions are made
- May not align with a seller’s specific pricing strategy
Conditional repricing automatically switches between different repricing rules based on predefined conditions. Instead of relying on a single rule, it adapts to factors like sales velocity, inventory levels, time of day, or competitor activity.
For example, a seller can set a rule to maintain higher prices for newer inventory but lower prices for aging stock to clear out old units before incurring storage fees.
✅ Pros:
- Automatically switches pricing strategies based on predefined conditions
- Helps manage inventory, sales velocity, and market shifts
- Offers flexibility without constant manual adjustments
❌ Cons:
- More complex to set up than standard rule-based repricing
- Requires fine-tuning to avoid mispricing in certain conditions
- Can still require monitoring to ensure it meets business goals
Now that we’ve explored the differences between rule-based, algorithmic, and conditional repricing, let’s see how these strategies come to life using repricing tools.
Platforms like BQool, SellerLogic, Repricer.com, and Informed.co offer solutions to help both private-label and wholesale sellers optimize pricing.
Next, we’ll walk through how to use BQool’s repricer tool to adjust prices, starting with private label and then wholesale sellers. Let’s get started!
Reprice With BQool for Private-Label Sellers
For private-label sellers, repricing directly impacts sales, profits, and brand positioning. With shifting market conditions, competition, and demand, prices can’t stay static.
This is where repricing tools like BQool’s come in handy.
For this tutorial, we’ll cover two key scenarios: adjusting prices based on how many units you’re selling and optimizing pricing based on inventory age using conditional repricing. Let’s see how BQool can help with both!
Reprice Based on Units Sold
Conditional Repricer can automatically adjust prices based on your sales velocity. So, if your sales are increasing, BQool can raise prices, if your sales are declining, BQool can drop prices.
This can be part of a profit-oriented strategy that enables you to make more profit on the products that sell very quickly. Here’s how to set it up:
Step 1: Log in to the BQool Central, then click on “Repricing Rules”. Next, choose “Conditional Repricing”.

Step 2: Based on your fulfillment method, choose the “Advanced Conditions”.

Step 3: Choose the sales conditions to focus on your sales performance.
Step 4: Fill out the fields. In the screenshow, we said that if the units sold in the last 7 days are equal to 30 then BQool will adjust the prices.

Reprice Based on Inventory Age
Step 1: Log in to the BQool Central and click on “Repricing Rules”. Next, choose “Conditional Repricing”, then “Advanced Conditions” based on your fulfillment method.

Step 2: Choose the inventory conditions. These conditions are useful for your stagnant, slow-moving inventory or if your inventory volume has a propensity to fluctuate violently.

Step 3: Fill out the fields. For example, the repricer can reprice for products with Inventory age that are older than 90 days.
In that situation the repricer would focus on your sales speed and not on the profit that means. So, the repricer will lower your price to enable you to sell faster.

Now that we’ve covered how private-label sellers can use BQool for strategic repricing, let’s explore how wholesale sellers can leverage its rule-based options to stay competitive and win the Buy Box.
Reprice With BQool for Wholesale Sellers
Winning the Buy Box is just the first step—staying there while maximizing profits is the real challenge.
That’s when repricing comes in handy.
Repricing helps you adjust to competition, demand, and inventory changes, ensuring you stay competitive without sacrificing margins.
But before setting up your repricer, it’s crucial to define your minimum and maximum price to maintain profitability and avoid pricing errors.
- Minimum Price: The lowest price you set to cover costs and maintain profit margins, ensuring you don’t sell at a loss.
- Maximum Price: The highest price you set to maximize profit without violating Amazon’s Fair Pricing Policy or losing Buy Box eligibility.
With these limits set, let’s explore how to use the BQool repricer to adjust your prices, win the Buy Box, and—more importantly—hold onto it for as long as possible.
Step 1: Set Up Your Repricing Rule
On the BQool dashboard, click on “Repricing Rules” > “Add New Rule.”

Step 2: Choose a Repricing Strategy
Next, select a repricing option. Below are six available strategies, each designed for different competitive situations:

1) Match Buy Box: When you’re not able to win the Buy Box, the repricer matches the price of the Buy Box owner to avoid intense price competition.
It’s suggested for sellers with a high number of positive feedback and ratings. However, if you get the Buy Box, there won’t be any price changes.
Best for: Products with high demand with less competition and possibly rising Best Seller Rank (BSR) as well as products that generate the most profits for your business.
2) Undercut the Buy Box Price- Oscillate: If you don’t have the Buy Box, this option lowers your price to compete with the Buy Box owner.
If their price reaches or drops below your minimum, the system sets your price to the maximum to protect profits.
If they raise their price above your minimum, your price adjusts downward to improve your chances of winning the Buy Box.
This option prevents prices from racing to the bottom if your products need to stay at a certain profit margin, and you want to stay away from your minimum price. This helps you shift between your set minimum and maximum prices.
3) Undercut the Buy Box Price: This option helps you compete with the Buy Box owner and only goes to a lower price. Once you get the Buy Box, the price will be raised to increase your profits. This option is more aggressive than the previous two but is effective in balancing sales and profits.
Best for: Replenishable products with stable demand and consistent competition.
4) Target the Lowest Price: If you don’t have the Buy Box, the system matches the lowest-priced competitors. Once you win the Buy Box, this option keeps your price the lowest among all sellers to stay competitive.
Best for: Overstocked, out-of-season, or highly competitive products, especially when competing with Amazon on the same listings.
5) Targets the Lowest FBA Price: This option helps you compete with the lowest FBA prices to remain at the lowest price among FBA competitors. When you get the Buy Box, the price will be raised to increase profits.
6) Custom Rule: This option lets you choose specific competitors and set custom repricing rules. It includes two key features: Winning the Buy Box and staying in the Buy Box. Let’s find out more about both:
Custom Rule: Winning the Buy Box
Step 1: On your BQool dashboard, choose “Rule-Based”, then click on “Custom Rule”.

Step 2: Choose the “Rule-Based Buy Box”.

Step 3: Select the “Buy Box price” option, then choose only the competitors who have the same fulfillment method that you use so you can compete with them.

Step 4: From the “Custom Settings”, make sure to exclude competitors with longer delivery time than yours or poor reviews, as they are unlikely to win the Buy Box anyway. This ensures that you’re focusing on your direct competitors.

Step 5: Choose the “Use Max Price” once there are no competitors on the Buy Box.

Custom Rule: Staying in the Buy Box
Now that you’ve set up the repricer to win the Buy Box, let’s explore how to keep it for as long as possible.
Step 1: On the BQool dashboard, choose “rule-based” then click on “Stay in Buy Box”.

Step 2: From the dropdown menu, choose the option that best aligns with your pricing strategy. Let’s find out when to use each option:
- Lower or Raise my Buy Box price: When the competitors’ price is below your price, your price will compete with it to ensure your price is the lowest among all the competitors.
- Raise my Buy Box price to maximize profit: Regardless of whether your price is the lowest or not, your listings will compete with other sellers whose prices are above yours, aiming to maximize your profits.
- Lower my Buy Box price to stay competitive: This option allows you to compete with the competitor who has the lowest price to ensure your price remains the lowest and you’re able to hold the Buy Box longer. However, if your price is the lowest, then your listing won’t be repriced.
- Do not change my Buy Box price: When you win the Buy Box, there won’t be any reprcing until you lose it.

Wrapping up
Pricing on Amazon isn’t a set-it-and-forget-it game—it’s a dynamic strategy that evolves with market trends, competition, and business goals.
Whether you’re launching a private-label product, competing for the Buy Box as a wholesaler, or fine-tuning your repricing tactics, the key to success is balancing profitability and competitiveness at every stage.
By leveraging the right tools, from market research with Helium 10 to automated repricing with BQool, sellers can make data-driven decisions that optimize margins, boost sales, and stay ahead of the competition.