From it’s beginning, Merch By Amazon (MBA) has attracted an influx of users who wanted to start their apparel business. But don’t be mistaken that the road will be filled with petals, though.
While Amazon Merch t-shirts are the “next big thing”, it can be difficult promoting your shirt designs in a saturated market. So how can a seller promote their shirts ? Keep on reading, and you’ll be surprised that there is an available choice by Amazon itself for tackling this challenge. (And it’s the best one!)

Some years ago, Amazon announced that Amazon Advertising (formerly known as Amazon Marketing Services (AMS)) was launching to some selected Merch by Amazon accounts!
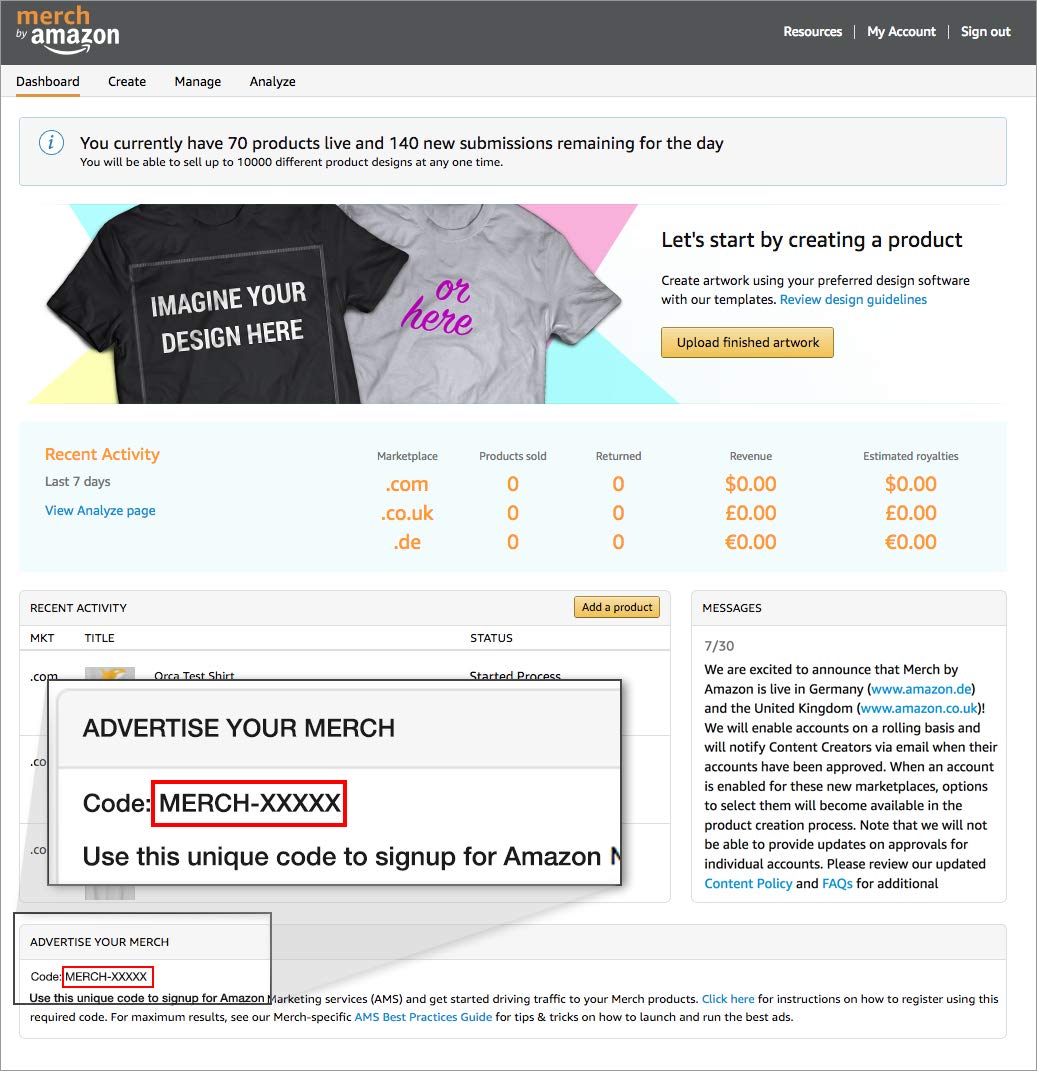
They gradually started rolling this out to the broader Merch community, but if you see a unique code on the bottom “Advertise your Merch” module of your Merch dashboard, Wohoo! your account is now eligible to register for an Amazon Advertising account.

And what’s so cool about this? The benefit of this is that you can begin driving traffic to your Merch products through Stores, Sponsored Products, and Sponsored Brands (formerly called as Headline Search Ads).
First things first, you might wonder how do I get this amazing code? Well, you wait patiently. Amazon will notify Content Creators via email when eligible or you can check your dashboard regularly. This is done on a rolling basis.

Moving forward, in order to ensure the vendor has access to sponsored ads he/she will need to request a separate Amazon Advertising account for their Merch products. This new account is intended to advertise Merch by Amazon products only.
NOTE: Advertising KDP or other products with your Merch advertising account is not permitted and can result in account termination. There are different instructions to follow for KDP accounts. Click here to know more about the same.
Without further ado, let’s get started with an ultimate guide to set up your Amazon Advertising Account…
Amazon Advertising Registration Instructions
- Get your unique code: When you receive an email update, go on your Merch dashboard, navigate & copy your unique code (will look like this: MERCH-XXXXX).

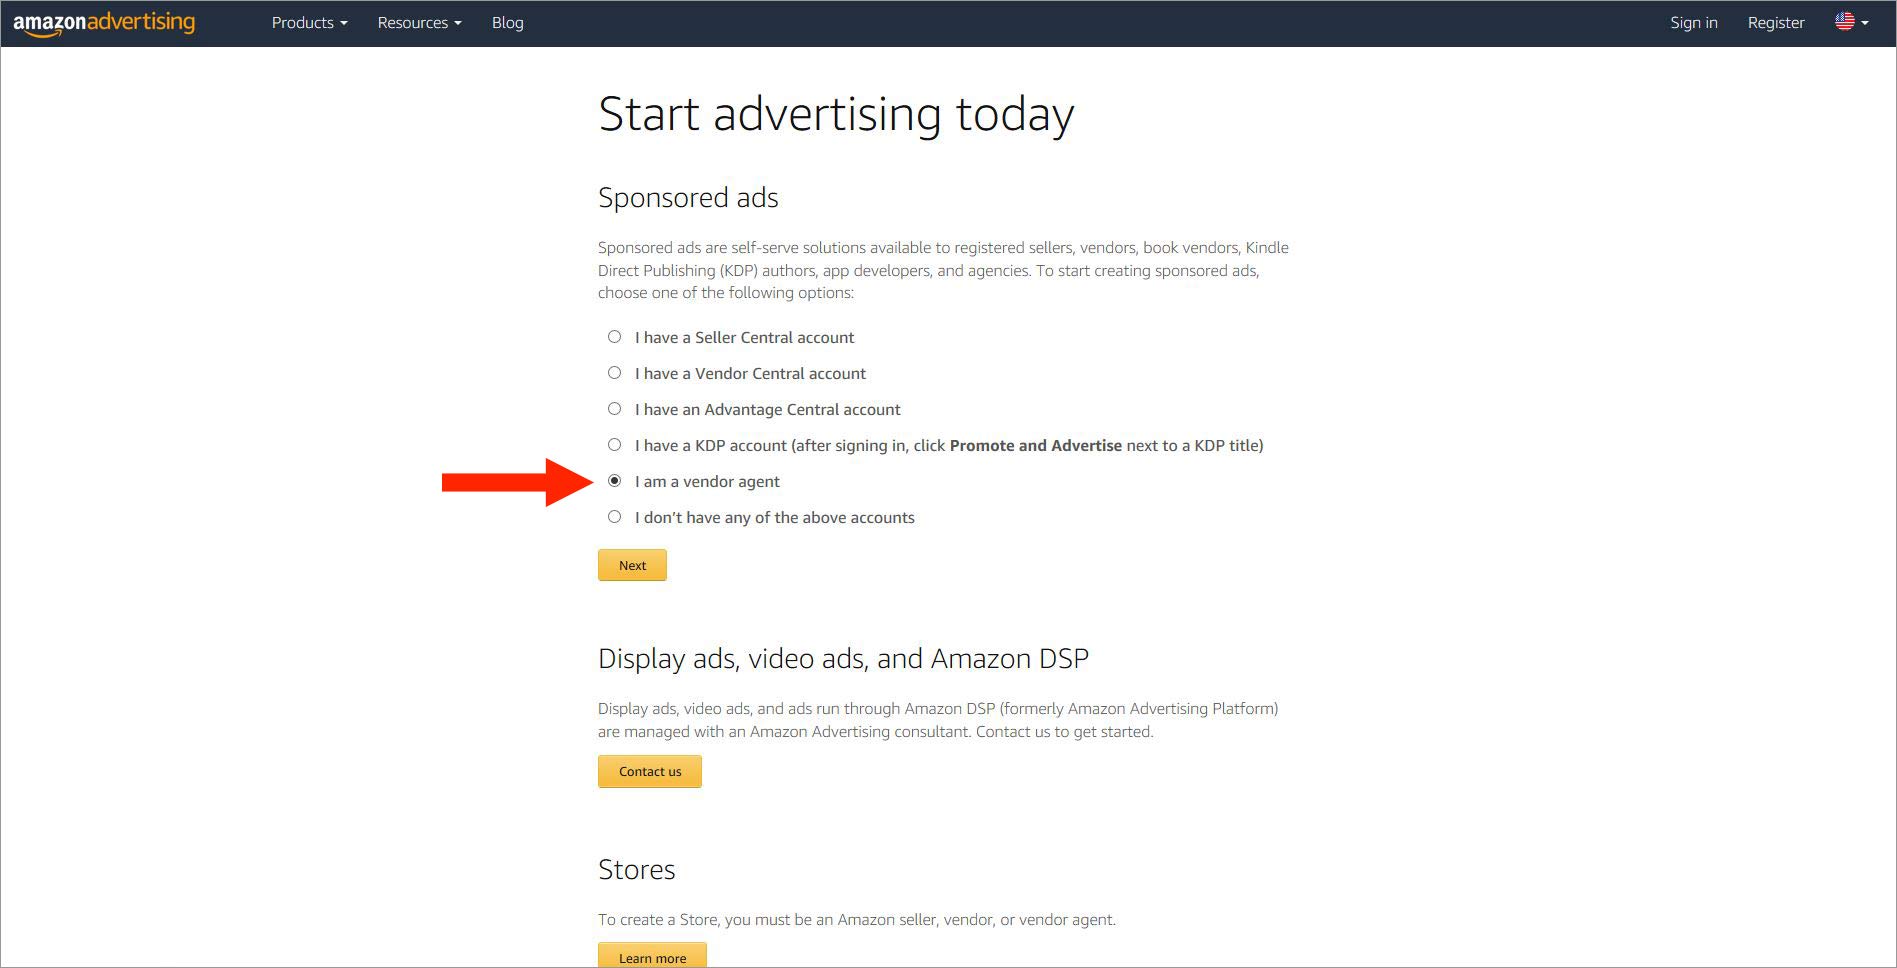
- Go to Amazon Advertising: Navigate to the Sponsored Ads homepage on Amazon Advertising Click here to get started.

- Request invitation: Select “I am a vendor agent”, don’t bother for other options as you are setting an Ad account for your merch & click the “Next” button.

- Sign in to Amazon : Sign in with your Amazon account information to begin the application request process.

You might raise a doubt here, if the seller has different brands, does that person need to complete a separate registration request for each one of his/her Merch brands?
The Answer by Amazon: “No. Please only submit one request per code as duplicate requests will be rejected. Once approved, you can use one overall Amazon Advertising account and add any sub-brands under this main account.”
- Complete the Request Form: Enter your account details exactly as they appear in your Merch portal under “My Account”.

Do keep in mind that Company and Brand details should be the same and match the exact Business name listed in “My Account”. Or If you don’t have an established Brand name, one can use their full name. Paste the unique code with the “MERCH-” suffix.
Once you accept the terms and conditions, click the “Request Access” button to submit your request. You will then see a confirmation that your request has been received.

IMP: This code is required for account approval, and submissions without this code have a higher chance of being rejected.
Voila, these were some basic steps to follow and send a request for your Amazon advertising account. Now, some cases can occur when you won’t be able to see Sponsored Products as an advertising option, only Sponsored Brands.

Don’t panic! As they might take a few days to appear as an option in your dashboard as the sponsored ads team is enabling these for the Merch community. If you don’t see this as an advertising option within a week after submitting your registration request, one can kindly reach out to the Amazon Advertising team for 1:1 support and provide the unique code from your Dashboard with the exact details from your Merch account.
Verification Process
- Verify the Email Address : As soon as the request has been submitted, you will receive 2 emails to the same email address you just provided in the before steps, which you will need to open and click the link to verify the registered email. It is essential to execute this, or your account won’t be activated.


- Verify Your Brand : Upon opening the second email, click the embedded link to proceed with the verification process. After that you will be brought back to the terms and conditions page, just go for the “Approve and Agree” button.


- Await for the Confirmation : Once the Amazon Advertising team has reviewed and verified the information, you will receive a final confirmation email that you can start launching sponsored ads.

To continue, and learn in-depth about how to set an Ad campaign and automate amazon advertising ads , do check out my blog, How to succeed on Merch By Amazon by Automating your Amazon Advertising Ads. This blog will cover Sponsored ads, setting keywords, bid management, budget and so on. I am sure reading this blog will make you more confident and you will just be ready to take on the journey of Advertising your brand. Flourish my friend!
That’s all folks…!

We at AiHello acknowledge and understand that driving revenues for your brand is not an easy task. Hence we got simple to deploy solutions for you. So, if you want to accelerate your E-commerce brand check out AiHello’s page for some amazing services.
Also, AiHello got your back to optimize your Ad campaigns that thrives for the best interest of your business and the ACoS targets you set. With AiHello Autopilot tool that works 24*7, there are not one or two benefits but definitely many more that will automate your PPC campaigns and boost up your revenues.
This way you can have a stress-free routine at work, enabling you to concentrate more on your product. If you would like to try AiHello AutoPilot, then head over to our registration page and give it a try. There is 14 days free trial with no payment information required.


